what

pom.xml-properties 中添加 Docker 镜像名称

1
2
3
<properties>
<docker.image.prefix>springboot</docker.image.prefix>
</properties>

plugins 中添加 Docker 构建插件:

1
2
3
4
5
6
7
8
9
10
11
12
13
14
15
16
17
18
19
20
21
22
23
24
25
26
<build>
<plugins>
<plugin>
<groupId>org.springframework.boot</groupId>
<artifactId>spring-boot-maven-plugin</artifactId>
</plugin>
<!-- Docker maven plugin -->
<plugin>
<groupId>com.spotify</groupId>
<artifactId>docker-maven-plugin</artifactId>
<version>1.0.0</version>
<configuration>
<imageName>${docker.image.prefix}/${project.artifactId}</imageName>
<dockerDirectory>src/main/docker</dockerDirectory>
<resources>
<resource>
<targetPath>/</targetPath>
<directory>${project.build.directory}</directory>
<include>${project.build.finalName}.jar</include>
</resource>
</resources>
</configuration>
</plugin>
<!-- Docker maven plugin -->
</plugins>
</build>

在目录src/main/docker下创建 Dockerfile 文件,Dockerfile 文件用来说明如何来构建镜像。

1
2
3
4
FROM openjdk:8-jdk-alpine
VOLUME /tmp
ADD spring-boot-docker-1.0.jar app.jar
ENTRYPOINT ["java","-Djava.security.egd=file:/dev/./urandom","-jar","/app.jar"]

这个 Dockerfile 文件很简单,构建 Jdk 基础环境,添加 Spring Boot Jar 到镜像中,简单解释一下:

  • FROM ,表示使用 Jdk8 环境 为基础镜像,如果镜像不是本地的会从 DockerHub 进行下载
  • VOLUME ,VOLUME 指向了一个/tmp的目录,由于 Spring Boot 使用内置的Tomcat容器,Tomcat 默认使用/tmp作为工作目录。这个命令的效果是:在宿主机的/var/lib/docker目录下创建一个临时文件并把它链接到容器中的/tmp目录
  • ADD ,拷贝文件并且重命名
  • ENTRYPOINT ,为了缩短 Tomcat 的启动时间,添加java.security.egd的系统属性指向/dev/urandom作为 ENTRYPOINT

这样 Spring Boot 项目添加 Docker 依赖就完成了。

what

通过dockerfile写入程序、库、资源、配置参数等,来生成image文件,可以类比node的package.json或者nginx.conf的文件

format

1
2
3
4
5
6
7
8
9
10
11
12
13
14
15
16
17
18
19
20
##  Dockerfile文件格式

# This dockerfile uses the ubuntu image
# VERSION 2 - EDITION 1
# Author: docker_user
# Command format: Instruction [arguments / command] ..

# 1、第一行必须指定 基础镜像信息
FROM ubuntu

# 2、维护者信息
MAINTAINER docker_user docker_user@email.com

# 3、镜像操作指令
RUN echo "deb http://archive.ubuntu.com/ubuntu/ raring main universe" >> /etc/apt/sources.list
RUN apt-get update && apt-get install -y nginx
RUN echo "\ndaemon off;" >> /etc/nginx/nginx.conf

# 4、容器启动执行指令
CMD /usr/sbin/nginx

build image

1
docker build

运行该命令时,根据dockerfile文件及上下文构建新的docker镜像,其中上下文是指dockerfile所在的本地路径或者网络路径url。

ps:dokcer build时候,会在后台守护进程daemon中进行,而不是cli(common line interface)中,构建前,构建进程将全部内容递归放到守护进程,将dockerfile文件放在(本就在空目录下构建)该目录下

还可以通过.dockerignore的文件来忽略上下文目录中的部分文件和目录,同.gitignore

通过-f命令指定文件位置,如:

1
docker buid -f /path/to/dockerfile .

image tag

镜像标签docker build -t ngix/v3

cache

Docker 守护进程会一条一条的执行 Dockerfile 中的指令,而且会在每一步提交并生成一个新镜像,最后会输出最终镜像的ID。生成完成后,Docker 守护进程会自动清理你发送的上下文。 Dockerfile文件中的每条指令会被独立执行,并会创建一个新镜像,RUN cd /tmp等命令不会对下条指令产生影响。 Docker 会重用已生成的中间镜像,以加速docker build的构建速度。

example

1
2
3
4
5
6
7
8
9
10
11
12
13
14
15
16
17
18
19
mkdir mynginx
cd mynginx
vi Dockerfile

//制作dokcerfile
FROM nginx
RUN echo '<h1>Hello, Docker!</h1>' > /usr/share/nginx/html/index.html

//save && run this code in mynginx
docker build -t nginx:v1 .
//v1 后面有一个空格和一个点
//点代表当前目录
//查看image
dokcer images

//run
dokcer run --name docker_nginx_v1 -d -p 80:80 nginx:v1
//docker_nginx_v1为容器名
//nginx:v1为image名

why nosql

NoSql可以处理结构化,非结构化的数据,可以水平伸缩,在实时和批量数据分析中具有优势

difference

why docker

  1. 解决“在我的机子上可以正常工作”的问题
  2. 运维更好地管理服务
  3. 更好地迁移和拓展(任意平台运行)

what is docker

docker属于Linux容器的一种封装,和VM类似,但他不像VM一样虚拟在操作系统之上,而是和操作系统平级,程序运行在容器里,就和在真实的物理机上面运行一样

img

简单一点理解就是:程序运行在docker上和真机上几乎误差,将程序包装起来管理

名词解释

  • daemon:守护进程
  • Client:命令行
  • image:镜像,用来创建容器
  • container:运行组件,启动的image就是容器
  • registry:管理image的地方

install

#ubuntu

$ sudo apt-get install docker-ce docker-ce-cli containerd.io

HelloWorld

1
2
3
sudo docker container run hello-world
//他会先找本地,然后再去仓库下载
//该过程将image变成容器,即image文件产生container文件

常用命令

docker pull image_name//拉取镜像

docker images//本地镜像

docker rmi xxx//remove image

docker ps//view what docker is running

docker ps -a

//以下使用cn代替 container_name/container_id

docker start|stop|restart cn

docker attach cn//启动后进入容器

dokcer rm cn

docker info

docker search nginx

16.0正式发布

我们从去年八月开始,努力将我们LineageOs的新特性移植到新版本的安卓上,非常感谢之前版本中的工作者们,我们才能够在这次的版本新特性中投入更多的精力,尤其是,隐私守护(Privacy Guard)和插件(su addon)上收到了了大量的提升建议。
通过对Styles API的一些细微更改,他现在可以兼容安卓暗黑模式的默认实现,在未来,越来越多的三方应用将遵循系统风格,这意味着Styles API将允许在跨应用程序时获得更一致的体验。
正如我们发布夏季第二次调研结果那样,我们将介绍Trust的新特性,首先是设备锁定时阻止新USB设备连接。请注意,由于基于底层,所以这个特性必须在每个设备底层中启用。Trebuchet现在还可以隐藏app以及在打开app前进行身份验证。该限制也仅在Trebuchet中,并非系统范围。
我们认为16.0的分支已经达到了15.1版本的特性测试并做好了发布准备。随着16.0分支成为最新最活跃的分支,在2019.3.1,它将开始日更新构建,并且15.1将会移动到周更新。
16.0版本将会从小部分机器开始运行,一些其他的机子如果准备好了,我们也会做一些小改动,开始构建,并通过改动构建脚本来更好地处理我们最新手机的,独特feature,以及由此产生的复杂问题

支持更新名单

  • Asus
  • BQ
  • Fairphone
  • Google
  • HTC
  • Huawei
  • LeEco
  • Lenovo
  • LG
  • Moto
  • Nextbit
  • Nubia
  • Nvdia
  • OnePlus(my oneplus 5T receive 16.0)
  • Oppo
  • Samsung
  • Sony
  • Wileyfox
  • Wingtech
  • Xiaomi
  • YU
  • ZTE
  • Zuk
  • more

其他热门的ROM

原文

Hello LineageOS 16.0

We’ve been working hard since August to port our unique features to this new version of Android. Thanks to the major cleanup and refactoring done in the previous version, we were able to focus more on features and reliability this time; in particular, both Privacy Guard and the su addon received a sizeable amount of improvements.

With some minor changes made to the Styles API, it is now compatible with what will eventually become the default implementation of dark mode in Android. In the future, more and more third party apps will follow the system style, meaning our Styles API will allow you to have a more coherent experience across apps.

As we announced when the Summer Survey 2 results were posted, we will be introducing new features to Trust, beginning with the ability to block new USB device connections when device is locked. Please note that this feature has to be enabled on a per-device basis due to the layer at which this was implemented. Trebuchet is also now able to hide apps and require authentication before opening them. Please note that this restriction is limited to Trebuchet and is not system-wide.

We feel that the 16.0 branch has reached feature parity with 15.1 and is ready for initial release. With 16.0 being the most recent and most actively-developed branch, on March 1st, 2019 it will begin receiving builds nightly and 15.1 will be moved to weekly builds.

LineageOS 16.0 will be launching with a small selection of devices. Additional devices will begin receiving builds as they are ready and after we make minor change to our build scripts to better handle the unique features, and resulting complications, of the most modern devices.

Upgrading to LineageOS 16.0

  1. (Optional) Make a backup of your important data

  2. Download the build either from

    download portal

    or built in Updater app

    • You can export the downloaded package from the Updater app to the sdcard by long-pressing it and then selecting “Export” in the popup menu
  3. Download proper addons packages (GApps, su…) for Android 9.0/Lineage OS 16.0

  4. Make sure your recovery and firmware are up to date

  5. Format your system partition

  6. Follow the “Installing LineageOS from recovery” section on your device’s installation page

Please note that if you’re currently on an official build, you DO NOT need to wipe your device.

If you are installing from an unofficial build, you MUST wipe data from recovery before installing.

写在最前面:该文章为笔记,来自纯洁的微笑

what is the loading of class

类加载即:

将编译class文件中的二进制数据读到内存中方法区,然后在堆区通过java.lang.Class实例化对象,对方法区的数据进行操作

img

该加载过程包含首次使用加载,以及预加载

加载class文件的方式

  • 本地
  • 网络
  • zip,jar文件中
  • 数据库
  • 动态编译

类的生命周期

img

problem

In LeetCode Store, there are some kinds of items to sell. Each item has a price.

However, there are some special offers, and a special offer consists of one or more different kinds of items with a sale price.

You are given the each item’s price, a set of special offers, and the number we need to buy for each item. The job is to output the lowest price you have to pay for exactly certain items as given, where you could make optimal use of the special offers.

Each special offer is represented in the form of an array, the last number represents the price you need to pay for this special offer, other numbers represents how many specific items you could get if you buy this offer.

You could use any of special offers as many times as you want.

examples

Example 1:

1
2
3
4
5
6
7
Input: [2,5], [[3,0,5],[1,2,10]], [3,2]
Output: 14
Explanation:
There are two kinds of items, A and B. Their prices are $2 and $5 respectively.
In special offer 1, you can pay $5 for 3A and 0B
In special offer 2, you can pay $10 for 1A and 2B.
You need to buy 3A and 2B, so you may pay $10 for 1A and 2B (special offer #2), and $4 for 2A.

Example 2:

1
2
3
4
5
6
7
Input: [2,3,4], [[1,1,0,4],[2,2,1,9]], [1,2,1]
Output: 11
Explanation:
The price of A is $2, and $3 for B, $4 for C.
You may pay $4 for 1A and 1B, and $9 for 2A ,2B and 1C.
You need to buy 1A ,2B and 1C, so you may pay $4 for 1A and 1B (special offer #1), and $3 for 1B, $4 for 1C.
You cannot add more items, though only $9 for 2A ,2B and 1C.

solution

1
2
3
4
5
6
7
8
9
10
11
12
13
14
15
16
17
18
19
20
21
22
23
24
25
26
27
28
29
30
31
32
33
34
35
36
37
38
39
40
41
42
43
44
45
import java.util.ArrayList;
import java.util.Arrays;
import java.util.List;

public class ShoppingOffers {
public static void main(String[] args) {
/*以下贴出测试方式,因为对ArrayList不熟悉,如有更好的方式,欢迎指出*/
List<Integer> price = new ArrayList<Integer>();
List<List<Integer>> special = new ArrayList<List<Integer>>();
List<Integer> needs = new ArrayList<Integer>();
price.add(0, 2);price.add(1, 5);
Integer[][] arr = new Integer[][] {{3,0,5},{1,2,10}};
special.add((List<Integer>)Arrays.asList(arr[0]));
special.add((List<Integer>)Arrays.asList(arr[1]));
needs.add(0,3);needs.add(1,2);
ShoppingOffers so = new ShoppingOffers();
int res = so.shoppingOffers(price, special, needs);
System.out.println(res);
}
public int shoppingOffers(List < Integer > price, List < List < Integer >> special, List < Integer > needs) {
return shopping(price, special, needs);
}
public int shopping(List < Integer > price, List < List < Integer >> special, List < Integer > needs) {
int j = 0, res = dot(needs, price);
for (List < Integer > s: special) {
ArrayList < Integer > clone = new ArrayList < > (needs);
for (j = 0; j < needs.size(); j++) {
int diff = clone.get(j) - s.get(j);
if (diff < 0)
break;
clone.set(j, diff);
}
if (j == needs.size())
res = Math.min(res, s.get(j) + shopping(price, special, clone));
}
return res;
}
public int dot(List < Integer > needs, List < Integer > price) {
int sum = 0;
for (int i = 0; i < needs.size(); i++) {
sum += needs.get(i) * price.get(i);
}
return sum;
}
}

key

本题目采用动态规划的思路,我们带入测试样例1的

1
2
3
4
>Input: [2,5], [[3,0,5],[1,2,10]], [3,2]
>即A=$2,B=$5
>3A=5$,1A+2B=10$
>需购买3A+2B
尝试 price
1:单买 16
2单买302套餐,还差2个B,则先算出2B的res为10,先试305套餐,A买超了,则退出305套餐,此时还有1210套餐,A买多了,退出套餐,两个套餐试完了,得到了单买两个B,$10的套餐,总价就为15元, 15(覆盖16)
3单买1210套餐,还差2A,0B,费用目前10元,先单买2A,费用4元,总价14元,然后先尝试305套餐,发现超,然后再试1210套餐,发现B超了,得到目前最低费用为14元 14(覆盖15)

问题的关键就在于clone的精髓之处,用来记录还需要多少零件的个数,使用递归,进行操作。如果不符合,(如买超了)直接break后,重新计算clone,直到special方法都试完了,然后才返回,如果一直都是break的状态则会返回单买的价格。

perfect

1
2
3
4
5
6
7
8
9
10
11
12
13
14
15
16
17
18
19
20
21
22
23
24
25
26
27
28
29
30
31
32
33
34
35
36
37
38
39
40
41
42
class Solution {

private Integer res;

public int shoppingOffers(List<Integer> price, List<List<Integer>> special, List<Integer> needs) {
res=Integer.MAX_VALUE;
int[] parr=new int[price.size()];
int[] aarr=new int[needs.size()];
for(int i=0;i<parr.length; i++){
parr[i]=price.get(i);
aarr[i]=needs.get(i);
}
findMinimum(special, 0, aarr, parr, 0);
return res;
}

private void findMinimum(List<List<Integer>> special, int curOffer, int[] remain, int[] single, int total){
if(total>=res||curOffer==special.size()) return;
int buyNow=buySingle(remain, single, total);
if(buyNow<res) res=buyNow;
int[] newRemain=remainAfterUse(special.get(curOffer), remain);
if(newRemain!=null) findMinimum(special, curOffer, newRemain, single, total+special.get(curOffer).get(remain.length));
findMinimum(special, curOffer+1, remain, single, total);
}

private int[] remainAfterUse(List<Integer> special, int[] remain){
int[] res=new int[remain.length];
for(int i=0;i<remain.length;i++){
res[i]=remain[i]-special.get(i);
if(res[i]<0) return null;
}
return res;
}

private int buySingle(int[] remain, int[] single, int total){
for(int i=0; i<remain.length; i++){
total+=remain[i]*single[i];
}
return total;
}

}

http2

优势

  • 更有效的网络利用率
  • 引入 HTTP Header 压缩减小报文体积
  • 在同一个连接中支持多路并发
  • 支持 Server Push

多路复用(Multiplexing)

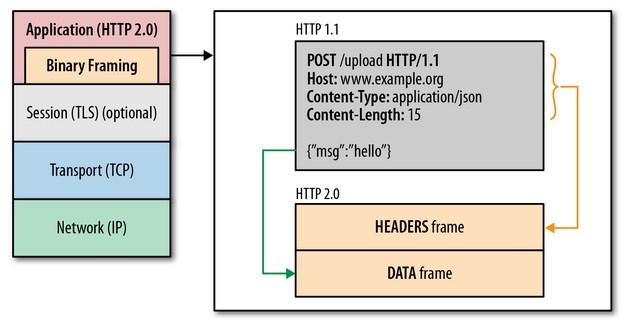
由于HTTP连接,起初有要求限制同一域名下的请求有数量限制,超过则被阻塞,而HTTP2可以发起多重请求,如同时请求样式文件和脚本文件

二进制分帧

img

HTTP/2 通过让所有数据流共用同一个连接,可以更有效地使用 TCP 连接,让高带宽也能真正的服务于 HTTP 的性能提升。

img

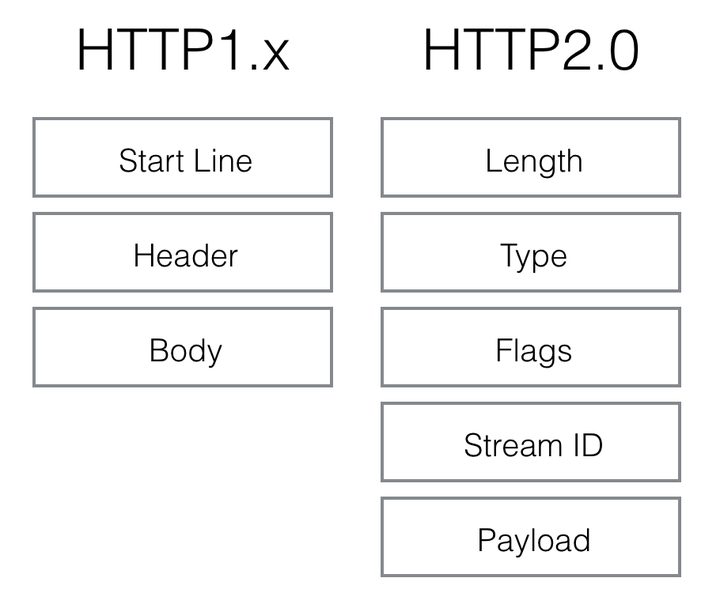
http2.0的格式定义更接近tcp层的方式,这张二机制的方式十分高效且精简。length定义了整个frame的开始到结束,type定义frame的类型(一共10种),flags用bit位定义一些重要的参数,stream id用作流控制,剩下的payload就是request的正文了。

server Push

http2.0能通过push的方式将客户端需要的内容预先推送过去

首部压缩(Header Compression)


BigInt


*fs.mkdir 和 fs.mkdirSync 支持递归参数


CLI Flag 自动补全


Windows 安装包优化


本文章思路来自https://zhuanlan.zhihu.com/p/56780733

定位

其实由于Egg本身的动态加载机制,所以JavaScript很难去做智能提醒(如变量定义检查),本次借鉴TS的动态生成d.ts,使用ts的Declaration Merging(声明合并)特性,读取JSDoc注释。

获取

  • 更新egg-bin模块
  • package.json 添加 “egg”: { “declarations”: true }

实操,升级个人GitHub项目chum,执行

npm i egg-bin

将其从4.9.0–>4.11.0并在package.json的尾部加上上述egg的kv,在根目录下生成tpyping文件夹,将app目录下的controller,model,以及根目录下的index,config目录都进行了ts文件生成

1550905277423

其实egg原生支持JavaScript,对于TS只是支持不推荐的态度,并没有使用TS去重构,本次智能提醒,应该是对JS一个劣势的补齐,解决方案也似乎借鉴了TS的方式,但又保留了人们书写JS的习惯

Problem

1
2
3
4
5
6
7
8
9
10
11
12
13
14
15
Given an array nums of n integers, are there elements a, b, c in nums such that a + b + c = 0? Find all unique triplets in the array which gives the sum of zero.

Note:

The solution set must not contain duplicate triplets.

Example:

Given array nums = [-1, 0, 1, 2, -1, -4],

A solution set is:
[
[-1, 0, 1],
[-1, -1, 2]
]

Solution

1
2
3
4
5
6
7
8
9
10
11
12
13
14
15
16
17
18
19
20
21
22
23
24
25
26
27
28
29
30
31
32
33
34
35
36
37
38
39
public class Solution {
public List<List<Integer>> threeSum(int[] nums) {
Arrays.sort(nums);
ArrayList<List<Integer>> res = new ArrayList<List<Integer>>();
for(int i = 0; i < nums.length - 2; i++){
// 跳过重复元素
if(i > 0 && nums[i] == nums[i-1]) continue;
// 计算2Sum
ArrayList<List<Integer>> curr = twoSum(nums, i, 0 - nums[i]);
res.addAll(curr);
}
return res;
}

private ArrayList<List<Integer>> twoSum(int[] nums, int i, int target){
int left = i + 1, right = nums.length - 1;
ArrayList<List<Integer>> res = new ArrayList<List<Integer>>();
while(left < right){
if(nums[left] + nums[right] == target){
ArrayList<Integer> curr = new ArrayList<Integer>();
curr.add(nums[i]);
curr.add(nums[left]);
curr.add(nums[right]);
res.add(curr);
do {
left++;
}while(left < nums.length && nums[left] == nums[left-1]);
do {
right--;
} while(right >= 0 && nums[right] == nums[right+1]);
} else if (nums[left] + nums[right] > target){
right--;
} else {
left++;
}
}
return res;
}
}

Key

tips:很久没有写Java了,花了点时间去整理了一些知识,所以上面的算法其实是ctrl+v的,现在整理一下list相关的知识:

1.List<List>为嵌套的list集合,声明方式

List<List****> list = new Array***()*

or

List<List> list = new ArrayList<>();//recomend

2.List是一个接口,而ArrayList是List接口的一个实现类

List list = new List();//是错误的用法

List list = new ArrayList();//list会丢失ArrayList的trimToSize()方法

ArrayList list=newArrayList()

3.然后明天再回来重新写这道题

0%